在之前的一篇文章《基于XML配置的方式使用Spring的IoC》中介绍了如何通过XML配置文件的方式来使用Spring的IoC,本文将在之前的文章中提到的案例的基础上通过注解方式使用Spring的IoC。
一、基本配置
1、导入依赖
要想使用Spring的注解功能,还需要导入spring-aop的依赖,不过该依赖已经包含在spring-context依赖中了,因此项目的pom.xml文件的内容与基于XML配置文件方式是相同的:
1
2
3
4
5
6
7
| <dependencies>
<dependency>
<groupId>org.springframework</groupId>
<artifactId>spring-context</artifactId>
<version>5.2.2.RELEASE</version>
</dependency>
</dependencies>
|
这里我使用的版本是5.2.2.RELEASE,请根据需要自行导入相应的版本。更多版本的信息请访问:spring-framework-releases或repo.spring.io 进行查询。
2、使用@Component注解配置管理的资源
(1)在数据访问层实现类AccountDaoImpl上加上@Component注解:
1
2
3
4
5
6
7
8
9
10
11
12
13
14
15
| package cn.frankfang.dao.impl;
import cn.frankfang.dao.IAccountDao;
import org.springframework.stereotype.Component;
@Component("accountDao")
public class AccountDaoImpl implements IAccountDao {
@Override
public void saveAccount() {
System.out.println("保存账户...");
}
}
|
(2)在服务层实现类AccountServiceImpl上加上@Component注解:
1
2
3
4
5
6
7
8
9
10
11
12
13
14
15
16
17
18
19
20
21
22
23
24
25
26
27
28
| package cn.frankfang.service.impl;
import cn.frankfang.dao.IAccountDao;
import cn.frankfang.service.IAccountService;
import org.springframework.stereotype.Component;
@Component("accountService")
public class AccountServiceImpl implements IAccountService {
private IAccountDao accountDao;
public AccountServiceImpl(IAccountDao accountDao) {
this.accountDao = accountDao;
}
@Override
public void saveAccount() {
accountDao.saveAccount();
}
}
|
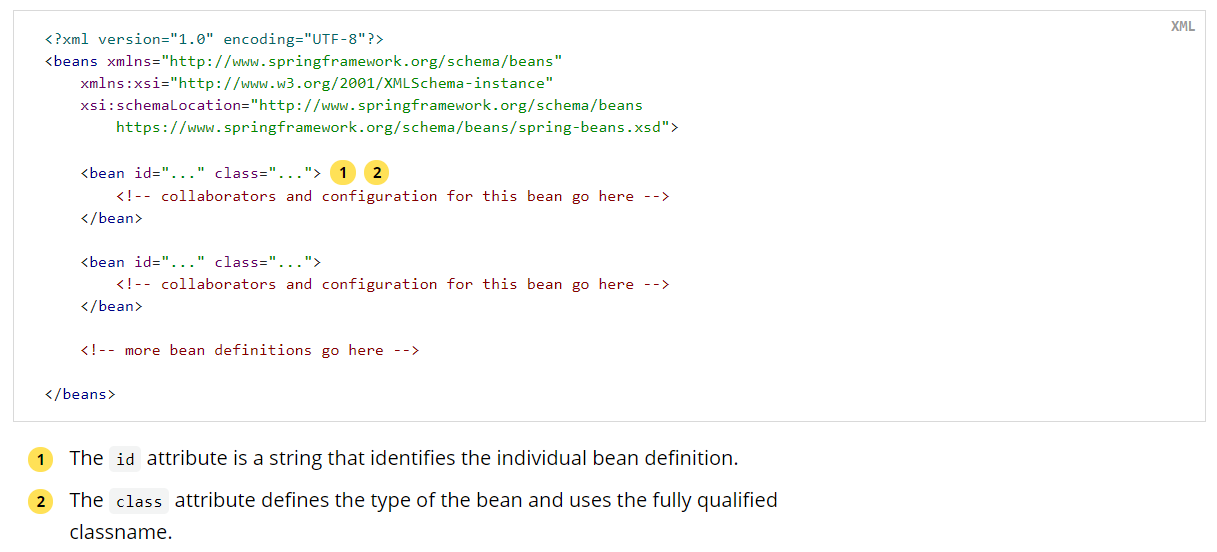
注:@Component注解相当于<bean id="" class=""></bean>
3、配置XML文件
1
2
3
4
5
6
7
8
9
10
11
12
13
| <?xml version="1.0" encoding="UTF-8"?>
<beans xmlns="http://www.springframework.org/schema/beans"
xmlns:xsi="http://www.w3.org/2001/XMLSchema-instance"
xmlns:context="http://www.springframework.org/schema/context"
xsi:schemaLocation="http://www.springframework.org/schema/beans
https://www.springframework.org/schema/beans/spring-beans.xsd
http://www.springframework.org/schema/context
https://www.springframework.org/schema/context/spring-context.xsd">
<context:component-scan base-package="cn.frankfang" />
</beans>
|
注意,基于注解的配置在基于XML配置文件的基础上还要加上一个context命名空间。
在配置完之后运行程序,控制台已经打印出结果。下面将详细介绍基于注解配置的方法。
二、常用注解
Spring框架中与IoC容器相关的注解主要有四种,分别是:用于创建对象的、用于注入数据的、用于改变作用范围的、与生命周期相关的。下面将分别介绍这四种常用的注解。
1、创建对象
(1)@Component
作用:把资源交给Spring来管理,相当于XML配置中的<bean>标签。
属性列表:
| 属性 |
作用 |
value |
指定bean的id。如果不指定该属性,默认bean的id是当前的类名,且首字母小写 |
(2)@Controller、@Service 和 @Repository
作用:都是@Component注解的衍生注解,它们的作用及属性都是相同的。下面给出这三个注解一般添加的位置:
| 注解 |
添加位置 |
@Controller |
一般用于表现层 |
@Service |
一般用于业务层 |
@Repository |
一般用于持久层 |
由此可以将案例中数据访问层实现类和服务层实现类改写为如下形式:
1
2
3
4
5
6
7
8
9
10
11
12
13
14
15
| package cn.frankfang.dao.impl;
import cn.frankfang.dao.IAccountDao;
import org.springframework.stereotype.Repository;
@Repository("accountDao")
public class AccountDaoImpl implements IAccountDao {
@Override
public void saveAccount() {
System.out.println("保存账户...");
}
}
|
1
2
3
4
5
6
7
8
9
10
11
12
13
14
15
16
17
18
19
20
21
22
23
24
25
26
27
28
| package cn.frankfang.service.impl;
import cn.frankfang.dao.IAccountDao;
import cn.frankfang.service.IAccountService;
import org.springframework.stereotype.Service;
@Service("accountService")
public class AccountServiceImpl implements IAccountService {
private IAccountDao accountDao;
public AccountServiceImpl(IAccountDao accountDao) {
this.accountDao = accountDao;
}
@Override
public void saveAccount() {
accountDao.saveAccount();
}
}
|
2、注入数据
(1)@Autowired
作用:自动按照类型进行注入。当使用注解注入属性时setter方法可以省略。该注解只能注入其它bean类型。当有多个类型匹配时,使用要注入的对象名称作为bean的id在Spring容器中查找,如果找到bean便可进行注入,如果找不到就报错。
属性列表:
| 属性 |
作用 |
required |
声明被注解的依赖是否是需要的,默认为true |
注:若需获取更多关于@Autowired的内容,请参阅:Using @Autowired。
由此我们就可以将案例中服务层实现类改写为以下形式:
1
2
3
4
5
6
7
8
9
10
11
12
13
14
15
16
17
18
19
20
21
22
| package cn.frankfang.service.impl;
import cn.frankfang.dao.IAccountDao;
import cn.frankfang.service.IAccountService;
import org.springframework.beans.factory.annotation.Autowired;
import org.springframework.stereotype.Service;
@Service("accountService")
public class AccountServiceImpl implements IAccountService {
@Autowired
private IAccountDao accountDao;
@Override
public void saveAccount() {
accountDao.saveAccount();
}
}
|
(2)@Qualifier
作用:在自动按照类型注入的基础上再按照bean的id注入。它在给成员变量注入时无法独立使用,必须和@Autowired注解一起使用,但是给方法参数注入时可以独立使用。
属性列表:
注:若需获取更多关于@Qualifier的内容,请参阅:Using @Qualifier。
(3)@Resource
作用:直接根据bean的id注入,该注解只能注入其它bean类型。
属性列表:
若需获取更多关于@Resource的内容,请参阅:Injection with @Resource。
(4)@Value
作用:注入基本数据类型和String类型的数据,通常用来获取.properties和.yml配置文件中的数据。
属性列表:
假设我们需要注入配置文件中的数据,可以采用如下写法:
1
2
3
4
5
6
7
8
9
| @Configuration
@PropertySource("classpath:application.properties")
public class AppConfig {
@Value("${database.username}")
private String username;
@Value("${database.password}")
private String password;
}
|
application.properties的内容如下:
1
2
| database.username=root
database.password=123456
|
若需获取更多关于@Value的内容,请参阅:Using @Value。
3、改变作用域
可使用@Scope注解来改变bean的作用域,@Scope中的value属性可以指定作用域范围,下表将对value可取的值进行说明:
| 取值 |
作用 |
singleton |
将单个bean定义限定为单个实例(默认) |
prototype |
将单个bean定义的范围限定为任意数量的对象实例(多例) |
request |
将单个bean定义限定为单个HTTP请求的生命周期(仅适用于Web应用) |
session |
将单个bean定义限定到HTTP会话的生命周期(仅适用于Web应用) |
application |
将单个bean定义限定为ServletContext的生命周期(仅适用于Web应用) |
websocket |
将单个bean定义限定到WebSocket的生命周期(仅适用于Web应用) |
若需获取更多关于@Scope的内容,请参阅:Providing a Scope for Autodetected Components。
4、与生命周期相关
该部分的配置相当于<bean id="" class="" init-method="" destroy-method="" />。下面将介绍替代init-method属性和destroy-method属性的注解。
(1)@PostConstruct
作用在方法上,代替init-method,用于指定初始化方法。
(2)@PreDestroy
作用在方法上,代替destroy-method,用于指定销毁方法。
若需获取更多关于@PostConstruct和@PreDestroy的内容,请参阅:Using @PostConstruct and @PreDestroy。
三、纯注解配置
在上面的内容中,我们介绍了基于注解的配置,但仍然需要编写XML配置文件,那么能不能不写XML配置文件,完全通过注解来使用Spring IoC容器呢?答案是肯定的,下面我们将介绍纯注解配置。
1、@Configuration
在项目中新建一个SpringConfiguration类,并在该类上添加@Configuration注解,该类就相当于spring-config.xml配置文件。
1
2
3
4
5
6
7
8
9
10
| package cn.frankfang.config;
import org.springframework.context.annotation.Configuration;
@Configuration
public class SpringConfiguration {
}
|
@Configuration用于指定当前类是一个Spring配置类,当创建容器时会从该类上加载注解。获取容器时需要使用AnnotationApplicationContext,并传入配置类的字节码对象。
该注解有一个value属性,用于指定配置类的字节码。
2、@ComponentScan
前面我们已经把XML配置文件用SpringConfiguration类来代替了,但是如何配置创建容器时要扫描的包呢?答案是使用@ComponentScan注解。
1
2
3
4
5
6
7
8
9
10
11
12
| package cn.frankfang.config;
import org.springframework.context.annotation.ComponentScan;
import org.springframework.context.annotation.Configuration;
@Configuration
@ComponentScan("cn.frankfang")
public class SpringConfiguration {
}
|
@ComponentScan注解的作用是指定Spring在初始化容器时要扫描的包,与XML配置文件中的<context:component-scan base-package=""/>是相同的。
该注解中包含了basePackages和value属性,它们的作用是相同的,都是用于指定要扫描的包。
3、@Bean
@Bean注解只能写在方法上,表明使用此方法创建一个对象,并且放入Spring容器中。该注解包含name和value属性,它们的作用是相同的,都是给当前被注解的方法指定一个id。
假设现在该项目需要配置数据源,此时可以使用@Bean将创建的数据源存入Spring容器中,代码如下:
1
2
3
4
5
6
7
8
9
10
11
12
13
14
15
16
17
18
19
20
21
22
23
24
25
26
27
28
29
30
31
32
33
34
| package cn.frankfang.config;
import com.mchange.v2.c3p0.ComboPooledDataSource;
import org.springframework.context.annotation.Bean;
import org.springframework.context.annotation.ComponentScan;
import org.springframework.context.annotation.Configuration;
import javax.sql.DataSource;
@Configuration
@ComponentScan("cn.frankfang")
public class SpringConfiguration {
@Bean("datasource")
public DataSource dataSource () {
try {
ComboPooledDataSource dataSource = new ComboPooledDataSource();
dataSource.setDriverClass("com.mysql.cj.jdbc.Driver");
dataSource.setJdbcUrl("jdbc:mysql://127.0.0.1:3306/test?useAffectedRows=true");
dataSource.setUser("root");
dataSource.setPassword("123456");
return dataSource;
} catch (Exception e) {
throw new RuntimeException(e);
}
}
}
|
注:若需获取更多关于@Bean的相关内容,请参阅:Using @Bean。
4、@PropertySource
@PropertySource注解用于加载.properties文件中的配置。该注解包含了value属性,用于指定properties文件的位置,可传入多个位置,如果在类路径下需要加上classpath:。
针对前面配置数据源的代码,我们可以将数据库账户名和密码等信息写在properties文件中,使用@PropertySource注解指定配置文件的位置,并使用@Value注解将properties文件中的数据注入到SpringConfiguration类的成员变量中。
1
2
3
4
5
6
7
8
9
10
11
12
13
14
15
16
17
18
19
20
21
22
23
24
25
26
27
28
29
30
31
32
33
34
35
36
37
38
39
40
41
42
43
44
45
46
47
48
49
| package cn.frankfang.config;
import com.mchange.v2.c3p0.ComboPooledDataSource;
import org.springframework.beans.factory.annotation.Value;
import org.springframework.context.annotation.Bean;
import org.springframework.context.annotation.ComponentScan;
import org.springframework.context.annotation.Configuration;
import org.springframework.context.annotation.PropertySource;
import javax.sql.DataSource;
@Configuration
@ComponentScan("cn.frankfang")
@PropertySource("classpath:application.properties")
public class SpringConfiguration {
@Value("${database.driver}")
private String driver;
@Value("${database.url}")
private String url;
@Value("${database.username}")
private String username;
@Value("${database.password}")
private String password;
@Bean("datasource")
public DataSource dataSource () {
try {
ComboPooledDataSource dataSource = new ComboPooledDataSource();
dataSource.setDriverClass(driver);
dataSource.setJdbcUrl(url);
dataSource.setUser(username);
dataSource.setPassword(password);
return dataSource;
} catch (Exception e) {
throw new RuntimeException(e);
}
}
}
|
application.properties的内容如下:
1
2
3
4
| database.driver=com.mysql.cj.jdbc.Driver
database.url=jdbc:mysql://127.0.0.1:3306/test?useAffectedRows=true
database.username=root
database.password=123456
|
注:若需获取更多关于@PropertySource的相关内容,请参阅:Using @PropertySource。
5、@Import
@Import注解的作用是用于导入其它配置类,在引入其它配置类时可以不添加@Configuration注解。该注解包含value属性,用于指定其它配置类的字节码,可传入多个值。
注:若需获取更多关于@Import的相关内容,请参阅:Using the @Import Annotation。
6、通过注解获取容器
通过纯注解方式获取容器的方式与通过XML配置文件获取文件的方式不同,需要使用AnnotaionConfigApplicationContext这一实现类去获取容器,使用方法如下:
1
2
|
ApplicationContext context = new AnnotationConfigApplicationContext(SpringConfiguration.class);
|
到这里我们就实现了通过纯注解的方式来配置使用Spring容器。
四、总结
基于注释的配置的引入引发了这样一个问题:这种方法是否比XML更好?这个问题简短的回答是“视情况而定”,冗长的回答是每种方法都有其优缺点,而且通常由开发人员决定哪种策略更适合他们。
注解配置简单,维护方便,但会使配置变得分散,更难控制;而XML擅长在不接触源代码或重新编译的情况下连接组件,但XML的配置比较繁琐。总的来说还是要视情况而定。但无论是全部使用XML配置文件,或是全部使用注解,甚至是XML配置和注解混合使用,Spring框架都能对其提供非常好的支持,这也体现出Spring框架的强大和包容。